Unity PostProcess Effect – 高斯模糊
简介
高斯模糊也叫高斯平滑,是在图像处理软件中广泛使用的处理效果,通常用它来减少图像噪声以及降低细节层次,其视觉效果就像是经过一个半透明屏幕在观察图像。从数学的角度来看,图像的高斯模糊过程就是图像与正态分布做卷积。由于正态分布又叫作高斯分布,所以这项技术就叫作高斯模糊。
原理
1.高斯模糊
上一篇文章,均值模糊是取该像素及周围像素的平均值作为最终值。而高斯模糊是取该像素及周围的值做加权平均作为最终值。越靠近像素本身,权值越高,越偏离像素的,权值越低,权值符合正态分布。
2.正态分布函数
一维正态分布函数:若随机变量x服从一个位置参数为μ、尺度参数为σ的概率分布,且其概率密度函数为下图,则这个随机变量就称为正态随机变量,正态随机变量服从的分布就称为正态分布。
![]()
当μ=0,σ=1时,正态分布就成为标准正态分布。
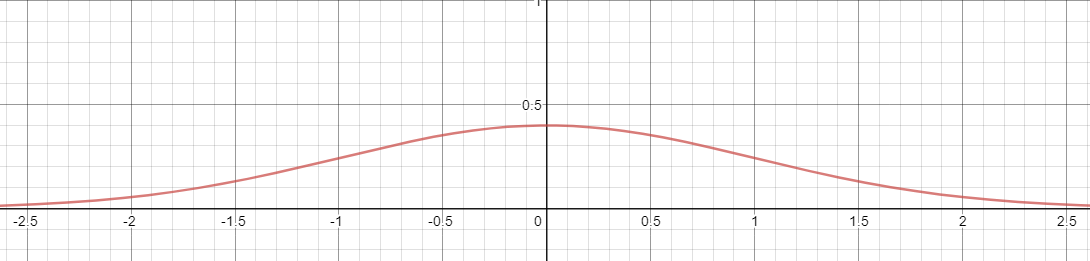
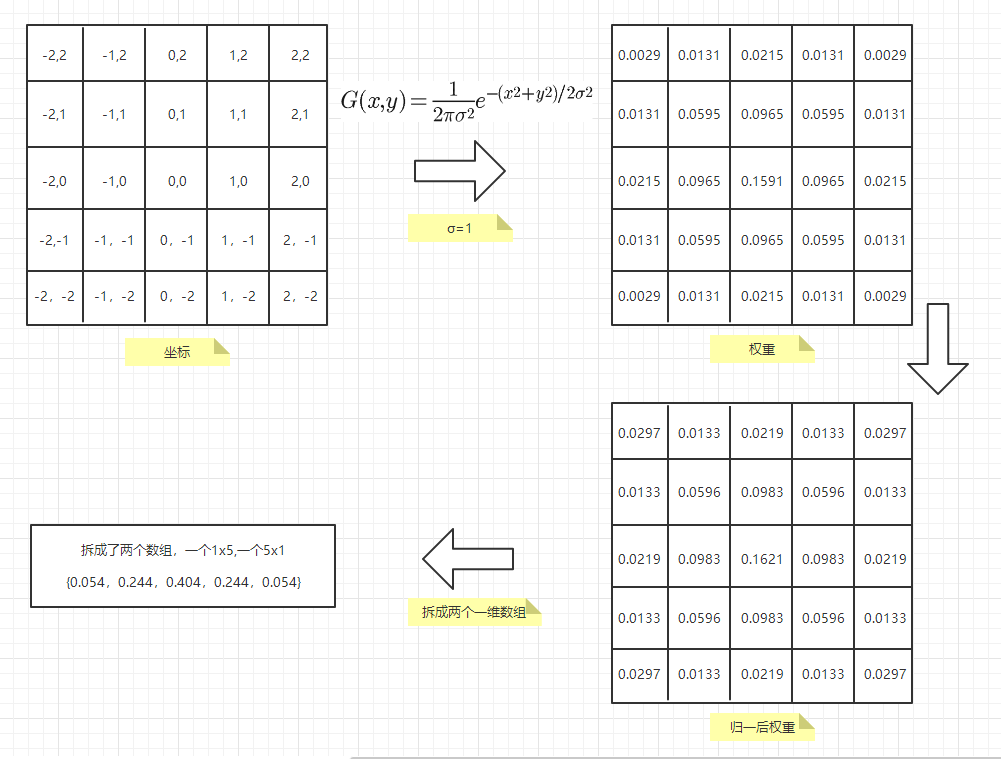
如图所示,离位置参数越近的值越大,越远的值越小。完美符合我们的需求,但是我们需要一个二维的正太分布函数,公式如下图。
![]()
3.根据线性可分属性优化
高斯模糊也可以在二维图像上对两个独立的一维空间分别进行计算,这叫作线性可分。这也就是说,使用二维矩阵变换得到的效果也可以通过在水平方向进行一维高斯矩阵变换加上竖直方向的一维高斯矩阵变换得到。从计算的角度来看,这是一项有用的特性,因为这样只需要 次计算,而不可分的矩阵则需要 次计算,其中 是需要进行滤波的图像的维数, 是滤波器的维数。
4.得出权重矩阵
实现
1.如何得到不同半径的权重矩阵
using System.Collections;
using System.Collections.Generic;
using UnityEngine;

public class GaussianKernal : MonoBehaviour
{
    public int size = 1;
    public float[] kernal;
    public float[][] temp;

    private int count =1;

    void Start()
    {
        count = 1 + 2 * size;
        kernal = new float[count];
        temp = new float[count][];
        for(int i = 0; i < count; i++)
            temp[i] = new float[count];

        int c = Mathf.FloorToInt(count / 2);
        float sum = 0;

        for(int i = 0; i < count; i++)
        {
            for(int j = 0; j < count; j++)
            {
                int dx = Mathf.Abs(i-c);
                int dy = Mathf.Abs(j-c);
                temp[i][j] = GaussianFun(dx,dy);
                sum += temp[i][j];
            }
        }

        for(int i = 0; i < count; i++)
        {
            for(int j = 0; j < count; j++)
            {
                temp[i][j] /= sum;
                if(i == j)
                    kernal[i] = Mathf.Sqrt(temp[i][j]);
            }
        }
    }

    float GaussianFun(float x, float y)
    {
        return (1/(2*Mathf.PI))*Mathf.Exp(-(x*x+y*y)/2);
    }
}
2.高斯模糊C#部分代码(与上一篇文章的均值模糊整合了一下)
using UnityEngine;

[ExecuteInEditMode]
public class NormalBlur : MonoBehaviour
{
    public enum BlurType
    {
        Normal = 0,
        Gaussian = 1,
    }

    public Camera camera;
    public Shader shader;

    public BlurType blurType = BlurType.Normal;
    public float blurScale = 0.1f;
    [Range(0,16)] public int iteration = 1;

    Material material = null;

    private Material GetMaterial()
    {
        if (material == null)
        {
            material = new Material(shader);
            material.hideFlags = HideFlags.HideAndDontSave;
        }
        return material;
    }

    void Start()
    {
        if(camera == null)
            camera = Camera.main;
        if(shader == null)
            shader = Shader.Find("FX/Blur");
    }

    void OnRenderImage(RenderTexture source, RenderTexture dest)
    {
        var mat = GetMaterial();
        mat.SetFloat("_BlurScale", blurScale);
        RenderTexture rt1 = RenderTexture.GetTemporary(source.width>>1,source.height>>1,0,source.format);
        RenderTexture rt2 = RenderTexture.GetTemporary(source.width>>1,source.height>>1,0,source.format);
        RenderTexture res = RenderTexture.GetTemporary(source.width>>1,source.height>>1,0,source.format);
        Graphics.Blit(source, res);

        for (int level = 0; level < iteration; level++)
        {
            if(blurType == BlurType.Normal)
            {
                rt1 = RenderTexture.GetTemporary(source.width>>level,source.height>>level,0,source.format);
                Graphics.Blit(res, rt1, mat, 0);
                Graphics.Blit(rt1, res, mat, 0);
            }
            else
            {
                rt1 = RenderTexture.GetTemporary(source.width>>level,source.height>>level,0,source.format);
                rt2 = RenderTexture.GetTemporary(source.width>>level,source.height>>level,0,source.format);
                Graphics.Blit(res, rt1, mat, 1);
                Graphics.Blit(rt1, rt2, mat, 2);
                Graphics.Blit(rt2, res);
            }
        }

        Graphics.Blit(res, dest);
        RenderTexture.ReleaseTemporary(rt1);
        RenderTexture.ReleaseTemporary(rt2);
    }
}
2.高斯模糊Shader部分代码(与上一篇文章的均值模糊整合了一下)
Shader "FX/Blur"
{
    Properties
    {
        _MainTex ("Texture", 2D) = "white" {}
        _BlurScale("Blur Scale", float) = 0.1
    }

    CGINCLUDE
        #include "UnityCG.cginc"

        struct appdata
        {
            float4 vertex : POSITION;
            float2 uv : TEXCOORD0;
        };

        struct v2f
        {
            float2 uv : TEXCOORD0;
            float4 vertex : SV_POSITION;
        };

        sampler2D _MainTex;
        float4 _MainTex_TexelSize;
        float _BlurScale;
        static float kernal[3] = {0.054,0.244,0.404};

        v2f vert (appdata v)
        {
            v2f o;
            o.vertex = UnityObjectToClipPos(v.vertex);
            o.uv = v.uv;
            return o;
        }

        fixed4 normalFrag (v2f i) : SV_Target
        {
            fixed4 color = tex2D(_MainTex, i.uv);
            color += tex2D(_MainTex, i.uv+float2(-1,0)*_BlurScale*_MainTex_TexelSize.x);
            color += tex2D(_MainTex, i.uv+float2(1,0)*_BlurScale*_MainTex_TexelSize.x);
            color += tex2D(_MainTex, i.uv+float2(0,1)*_BlurScale*_MainTex_TexelSize.y);
            color += tex2D(_MainTex, i.uv+float2(0,-1)*_BlurScale*_MainTex_TexelSize.y);
            return color/5;
        }

        fixed4 gaussianFragH (v2f i) : SV_Target
        {
            fixed4 color = kernal[2]*tex2D(_MainTex, i.uv);
            UNITY_UNROLL
            for(int j=0;j<2;j++)
            {
                color += kernal[j]*tex2D(_MainTex, i.uv+float2(j-2,0)*_BlurScale*_MainTex_TexelSize.x);
                color += kernal[j]*tex2D(_MainTex, i.uv+float2(2-j,0)*_BlurScale*_MainTex_TexelSize.x);
            }
            return color;
        }

        fixed4 gaussianFragV (v2f i) : SV_Target
        {
            fixed4 color = kernal[2]*tex2D(_MainTex, i.uv);
            UNITY_UNROLL
            for(int j=0;j<2;j++)
            {
                color += kernal[j]*tex2D(_MainTex, i.uv+float2(0,j-2)*_BlurScale*_MainTex_TexelSize.y);
                color += kernal[j]*tex2D(_MainTex, i.uv+float2(0,2-j)*_BlurScale*_MainTex_TexelSize.y);
            }
            return color;
        }
    ENDCG

    SubShader
    {
        // No culling or depth
        Cull Off ZWrite Off ZTest Always

        // 0: normal blur
        Pass
        {
            CGPROGRAM
                #pragma vertex vert
                #pragma fragment normalFrag
            ENDCG
        }

        // 1: gaussian blur: horizontal
        Pass
        {
            CGPROGRAM
                #pragma vertex vert
                #pragma fragment gaussianFragH
            ENDCG
        }

        // 2: gaussian blur: vertical
        Pass
        {
            CGPROGRAM
                #pragma vertex vert
                #pragma fragment gaussianFragV
            ENDCG
        }
    }
}
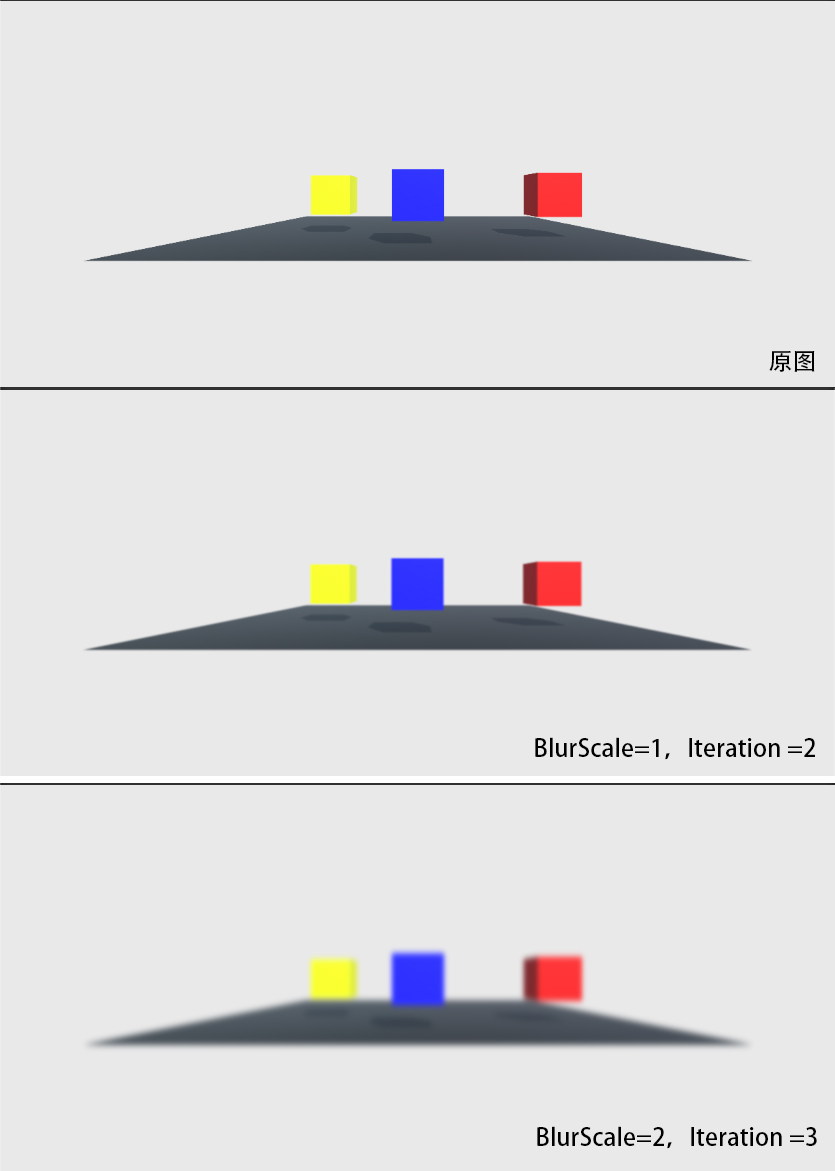
效果预览
参考链接
1.图像卷积滤波与高斯模糊
2.Unity shader学习之屏幕后期处理效果之高斯模糊
3.高斯模糊
4.Unity Shader-后处理:高斯模糊
Done!(๑•̀ㅂ•́)و✧
About The Author
chongchongs
为成为一个独立游戏开发者而奋斗着~